Tutorial: Staff Application Form
In this tutorial, we'll walk through the process of creating a staff application form using the Forms module. Staff application forms are common in the venue community and are used to collect information from users who wish to apply for a staff position within the venue.
We'll break down the process of creating such a form for your venue!
Preparation
To begin, ensure that you have FroggeBot installed in your server.
** Add More preparation steps here **
Creating the Form
To create a new form, run the /admin forms command in a private channel
where you can work quietly. Assuming you haven't created any forms prior to this,
you'll be greeted with the following menu message, which indicates that no forms
have been created yet:

Let's start by creating a new form. Select to begin.
The first thing you'll be presented with is a form title prompt. This is the title
of the form that users will see when they interact with it. For our staff application
form, let's simply use "Staff Application" as the title.

The next prompt may seem a bit overwhelming, but don't worry! We'll take this step by step and examine each button and its purpose.
Adding Questions
The first step in creating a form is to add questions. Questions are the building blocks of a form and are used to collect information from users. Let's start by adding a question to our form.
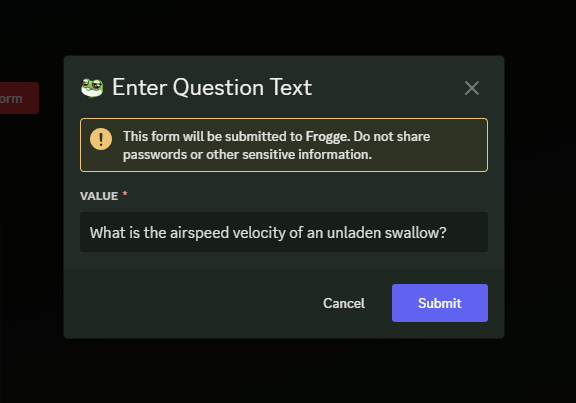
Click and you'll be presented with a prompt to enter the question text. For our staff application form, let's start with a simple question like "What is your character name?"
After entering the question text, you'll be redirected to the main question menu. Here, you can edit the question text, add options (for multiple-choice questions), or delete the question entirely.
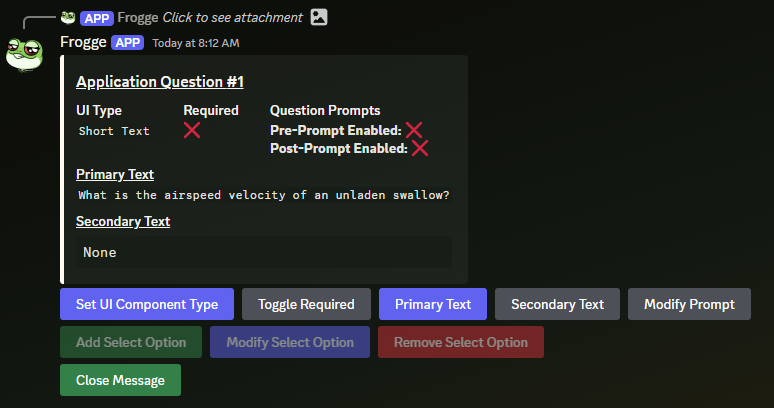
Question Attributes
Each question has a set of attributes that can be edited to customize the question's behavior.
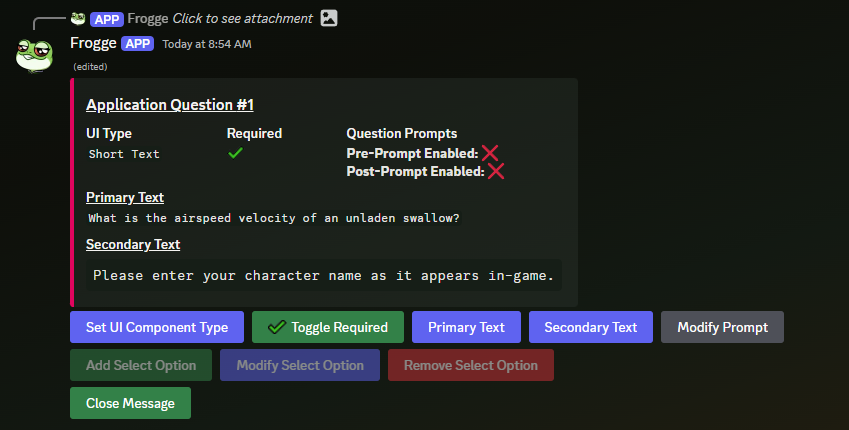
Question 1: What is your FFXIV character name?
Note
Make sure to review each tab below to ensure that the question is set up correctly.
This attribute determines the type of user interface component that will be used to collect the user's response. The available options are:
Short Text- A simple single-line text input field.Long Text- A multi-line text input field.Select- A dropdown menu with predefined options.Multi-Select- A dropdown menu with predefined options where multiple options can be selected.
For our staff application form, let's use the Short Text component type to collect the user's
character name. This is the default option, so we can leave it as-is.
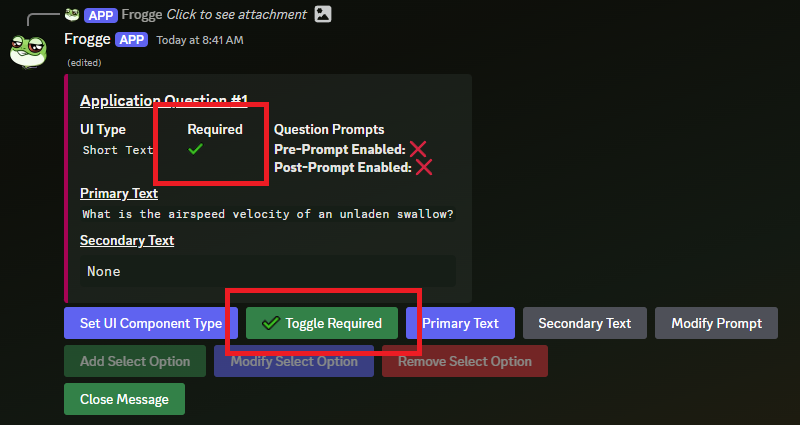
This attribute determines whether the question is required or optional. If a question is marked as required, users will be unable to submit the form without answering it.
For our staff application form, we'll mark the character name question as required.
This attribute controls the title text displayed to the user when they view the question. This text is typically used to provide the main context or instructions for the question.
This field is the same as the question text we entered earlier. You can edit it here if needed, but for our staff application form, we'll leave it as-is.
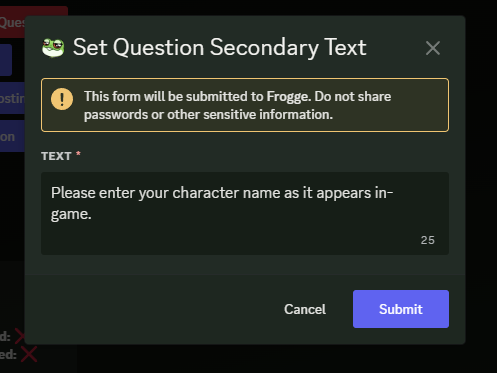
This attribute controls the secondary text displayed to the user when they view the question. This text is typically used to provide additional context or instructions for the question.
For our staff application form, we can use this field to provide additional instructions or context
for the question. Just for the sake of example, let's add a secondary text like
"Please enter your character name as it appears in-game."
We should now have a basic question set up to collect the user's character name!
Great we have our first question set up! Let's add a few more questions to our form to collect additional information from the user. Each of the following questions is designed to take advantage of a different type of UI component to demonstrate the flexibility of the Forms module.
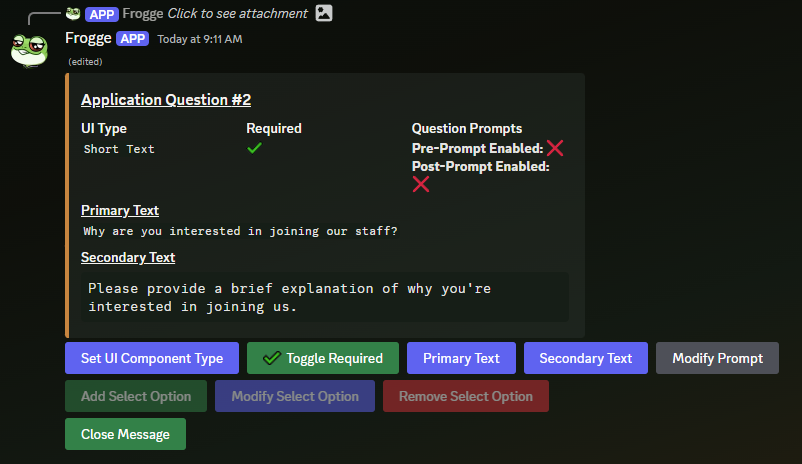
Question 2: Why are you interested in joining our staff?
For this question, we'll use the Long Text UI component type to allow users to provide a more detailed
response. Let's add this question to our form.
Note
Make sure to review each tab below to ensure that the question is set up correctly.
Change the UI component type to Long Text to allow users to provide a more detailed response.
Mark the question as required to ensure that users provide an answer.
Set the primary text to "Why are you interested in joining our staff?" to provide context for the question.
Add a secondary text like "Please provide a brief explanation of why you're interested in joining
our staff." to guide users.
Nice! We now have a second question set up to collect the user's interest in joining the staff.
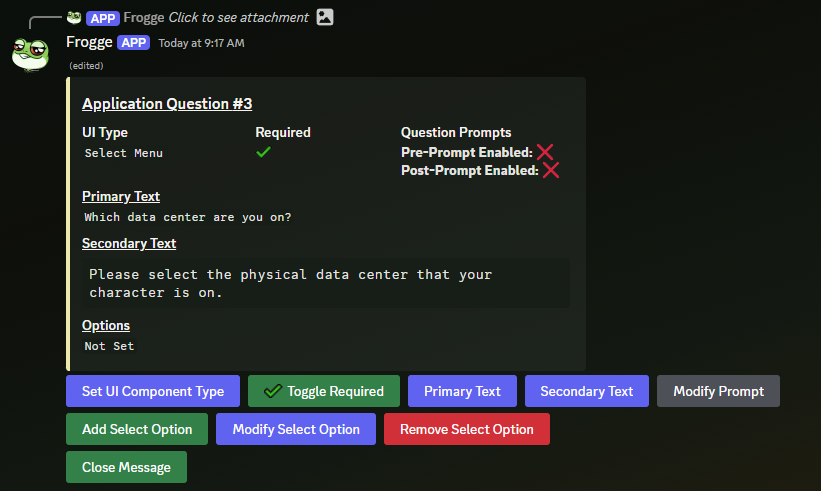
Question 3: Which data center are you on?
For this question, we'll use the Select UI component type to provide users with a dropdown menu of options
to choose from. Let's add this question to our form.
Note
Make sure to review each tab below to ensure that the question is set up correctly.
Change the UI component type to Select Menu to provide users with a dropdown menu of options.
Mark the question as required to ensure that users provide an answer.
Set the primary text to "Which data center are you on?" to provide context for the question.
Add a secondary text like "Please select the physical data center that your character is on."
to guide users.
Adding Select Options
Now here is where we can get creative! We'll add a few options to the dropdown menu for users to choose from. Click on the button to add a new option.
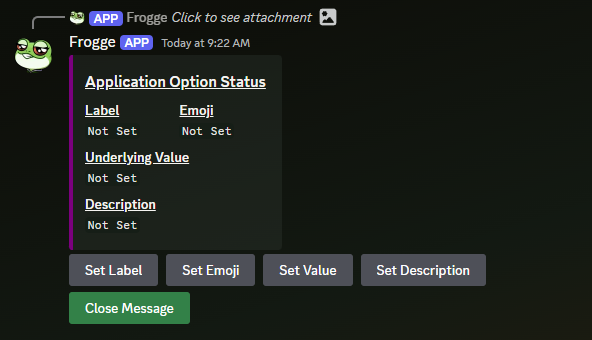
At the next prompt, click on the button to set the option's main text.
For our data center question, let's add the North America data center to start.
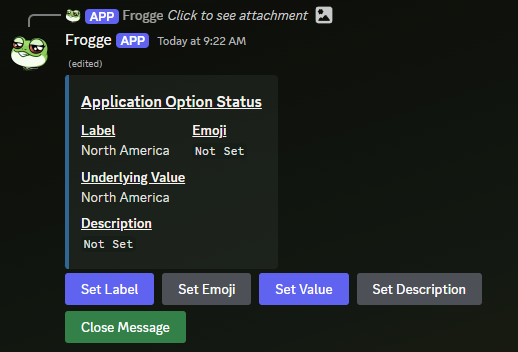
And now we have our first option added to the dropdown menu!
Underlying Value
You may note that the Label field is now set, however the Underlying Value field is set as well.
Typically, these will be the same, but you can set the Underlying Value to a different value if needed.
This is useful for cases where the displayed text is different from the value that will be stored in the database.
For our purposes, we'll leave it as-is.
For the sake of decoration, let's add an emoji to the option to make it more visually appealing. Click on the button to add an emoji to the option.
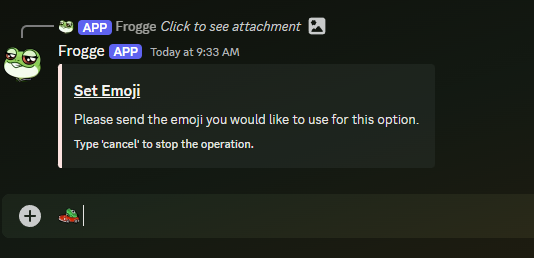
Just send the emoji you'd like to use in the chat, and it will be added to the option.
Lastly, let's add a description to the option to provide additional context for users. Click on the
button to add a description. We'll add a brief
description like "North America Is Stinky" to the option.
And there we have it! Our first option is set up with a label, emoji, and description. We'll see how it looks in the dropdown menu shortly.

Additional Options
Now that we have our first option set up, let's add a few more options to the dropdown menu. Repeat the
process of adding options for the Europe, Japan, and Oceanan data centers.
After completing the options, and closing back out of the option messages, you should see the main question menu update and look something like this:
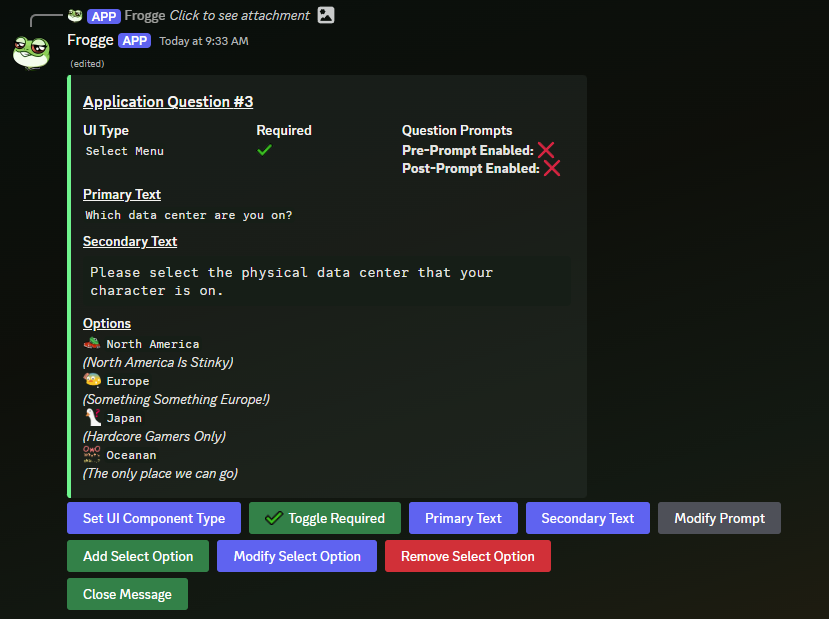
Great! We now have a question set up to collect the user's data center.
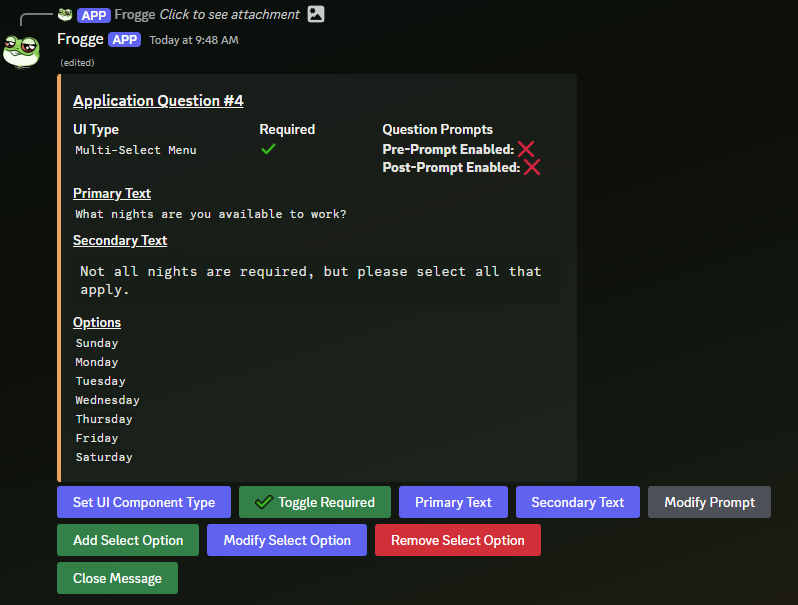
Question 4: What nights are you available to work?
For this question, we'll use the Multi-Select UI component type to allow users to select multiple options
from a list. Let's add this question to our form.
Note
Make sure to review each tab below to ensure that the question is set up correctly.
Change the UI component type to Multi-Select Menu to allow users to select multiple options.
Mark the question as required to ensure that users provide an answer.
Set the primary text to "What nights are you available to work?" to provide context for the question.
Add a secondary text like "Not all nights are required, but please select all that apply." to guide users.
Let's also add a few options to the multi-select menu for users to choose from. For this kind of question you'll typically add the days on which there are shifts available, but for the sake of this tutorial, we'll add options for each day of the week. Once completed, the question should look something like this:
Now that we have a few questions set up, let's go back and take a look at the form as a whole to see what else we can add or modify.
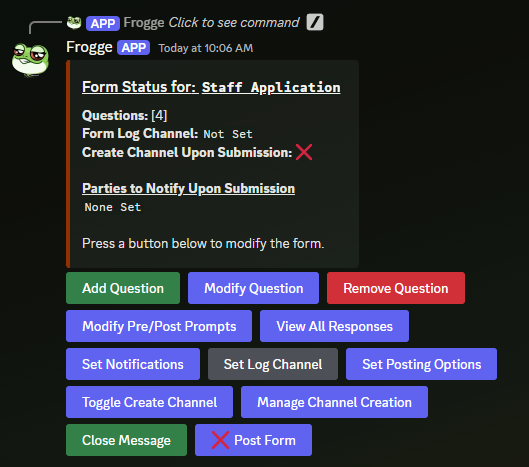
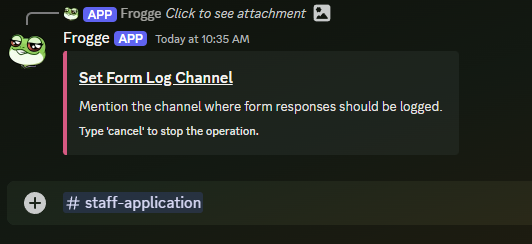
Logging Responses
We've just added a few questions, but now let's take a look at the logging options for the form. Right now if you were to submit the form, the responses would be lost. We can prevent this by setting a log channel for the form.
Click on the button.
For our purposes, a simple text channel named #staff-application will suffice. Enter a mention of the channel
you want to use, and the log channel will be set.
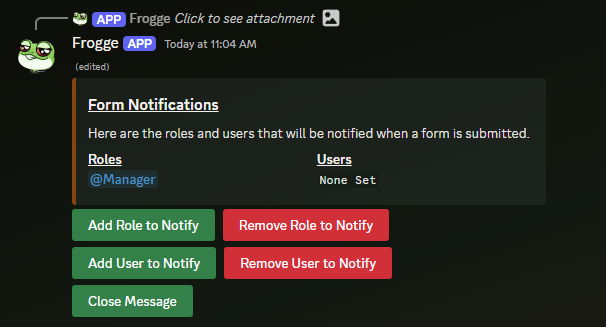
Notifying on Submit
Next, let's set up a notification for when a user submits the form. This can be useful for alerting management that a new application has been submitted.
Select the button to configure notifications.
Here we can both add and remove roles or individual users that will be notified when a form is submitted.
For our purposes, we'll add the @Management role to the notification list.
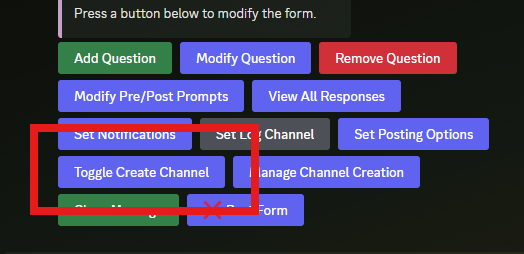
Channel Creation
For the purposes of this tutorial, we'll create a new channel for each staff application submitted. This channel creation functionality might not be as useful for staff applications, but it can be very useful for other types of forms, such as event sign-ups, feedback forms, or ticketing systems.
Let's begin by toggling on the channel creation feature.
Click on the button to enable channel creation.
The menu will update to show the channel creation options. Here you can set the creation category and
default user/role permissions. For our purposes, we'll set the category to Management and the
permissions to @Manager. This will ensure that the new channel is created in the Management category
and that only users with the @Manager role can access it.
Pre- and Post-Prompts
Before and after a user submits a form, you can display custom messages to provide additional context or instructions. These messages can be used to guide users through the form submission process or to thank them for their submission. These messages are optional but can be a nice touch to enhance the user experience.
Let's set one up now. Click on the button on the main form menu.
Then click the button to set up a message that we can display to users before they begin working on their form.
For our purposes, we'll set a simple warning about ensuring all information is accurate. We'll also include a Cancel button with the prompt in case the user just wants to back out of the form. Here's how we can configure all the prompt fields:
Note
Make sure to review each tab below to ensure that the prompt is set up correctly.
The title of the prompt. This is displayed at the top of the prompt message.
For our purposes, we'll set the title to "Warning!".
The main body text of the prompt. This is displayed below the title and above the buttons.
For our purposes, we'll set the description to "Please ensure all information is accurate before submitting.".
An optional thumbnail image to display alongside the prompt. This can be used to add visual flair to the message.
For our purposes, we'll leave this field blank.
This toggle controls whether or not a Cancel button is displayed with the prompt. If enabled, users can click the button to exit the form without submitting.
For our purposes, we'll set this option to ON, allowing users to cancel the form submission (in case
they were planning on lying!).
Similarly, a post-form prompt can be set up to display a message to users after they submit the form. This can be used to thank users for their submission or to provide additional instructions.
Tip
If you're observant, you may have noticed that each question can also have its own prompts. These prompts are displayed to users when they view the question and can be used to provide additional context or instructions for the question. Set them up in the same way as the form prompts.
Posting the Form
Now that we have our form set up with questions, logging, notifications, channel creation, and prompts, we're ready to post the form for users to fill out.
Note
Make sure to review each tab below to ensure that the form post is set up correctly.
The main body text of the form post. This is displayed below the name of the form.
For our purposes, we'll set the description to "Please fill out the following form to apply for a staff position.".
The channel where the form will be posted. This is the channel where users will see the form and submit their responses.
For our purposes, we'll set the post channel to #staff-applications.
An optional thumbnail image to display alongside the form post. This can be used to add visual flair to the post.
For our purposes, we'll leave this field blank.
An accent color to be used for the form post. This field is optional.
Color Picker
This must be a valid HEX color code. Please consult the Google Color Picker for assistance.
The label text for the form button. This is the text that users will see on the button they click to begin filling out the form.
For our purposes, we'll set the button label to "Start Your Application Here".
An optional emoji to display alongside the form button. This can be used to add visual flair to the button.
For our purposes, we'll add any random emoji the bot has access to.
Once all the fields are set up, the form post menu should look something like this:
Now, by clicking the button on the main form menu, the form will be posted in the specified channel for users to fill out.
Exploring the Form
Now that the form is posted, users can interact with it to submit their responses. Let's take a look at how the form appears to users and how they can submit answers.
When users click the button to start the form, they'll be presented with a Paginator that allows them to navigate through the form questions. The primary and secondary text for each question will be displayed alongside whether the question is required or optional. The arrow keys at the bottom of the Paginator can be used to navigate between questions.
Note
Notice that when we click the button to start the Staff Application Form, we're presented with the pre-form prompt that we set up earlier!
Users can click the button to begin answering a question so let's try that now.
Note that because Question One is a short text question, users are presented with a text input field to enter their response. Once they've entered their response, they can click the button to submit their answer.